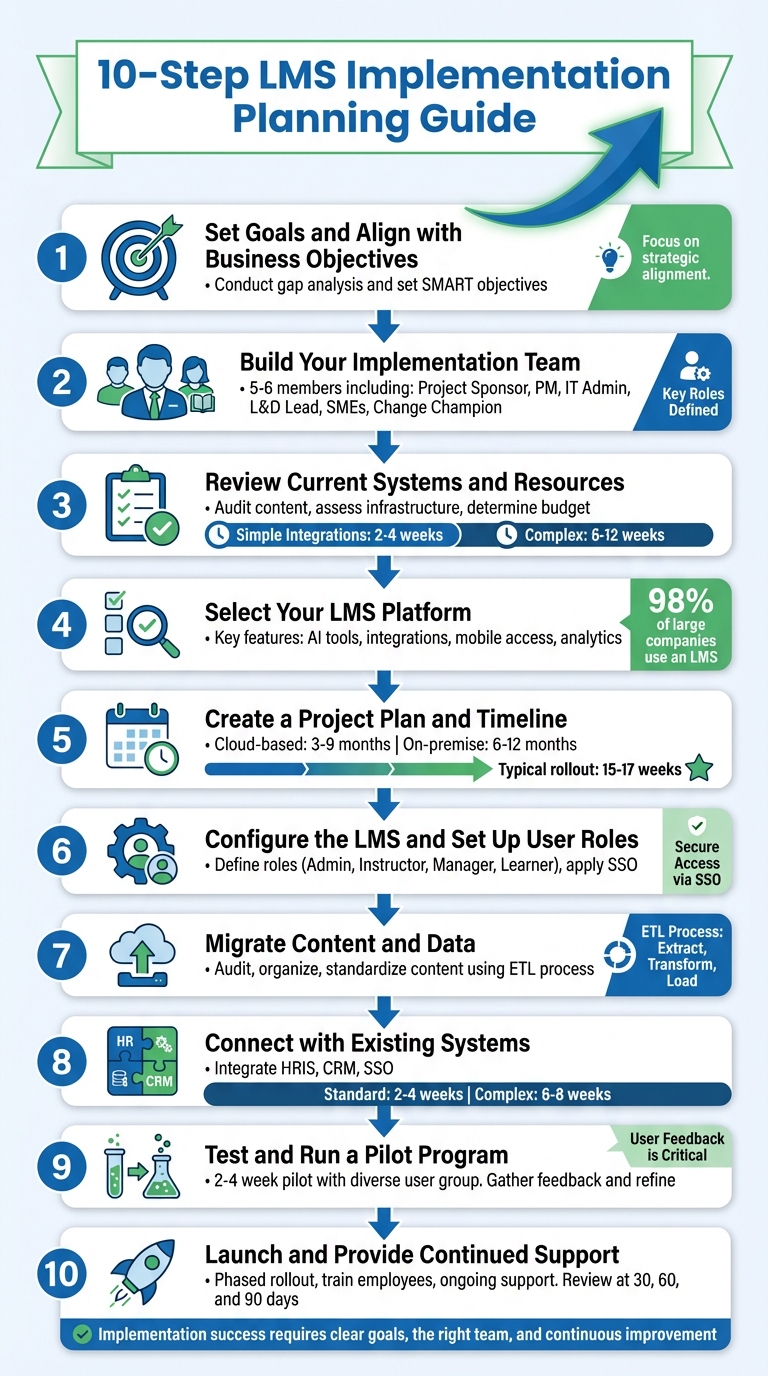
LMS Implementation: 10-Step Planning Guide
LMS implementation can be a game-changer for managing and delivering training - but only if done right. Without a structured plan, businesses risk low adoption, data issues, and wasted resources. This guide simplifies the process into 10 essential steps to help you avoid common pitfalls and achieve measurable results.
Key Takeaways:
- Start with clear goals: Align your LMS with business needs like reducing turnover or improving sales.
- Build the right team: Include roles like Project Sponsor, IT Administrator, and Change Champion for smooth execution.
- Evaluate your systems: Audit current tools, content, and infrastructure before migrating.
- Choose the right platform: Focus on features like AI tools, integrations, and mobile access.
- Test and refine: Run a pilot program to fix issues and gather feedback before the full rollout.
By following these steps, you'll not only launch your LMS but ensure it drives real results for your business and employees.
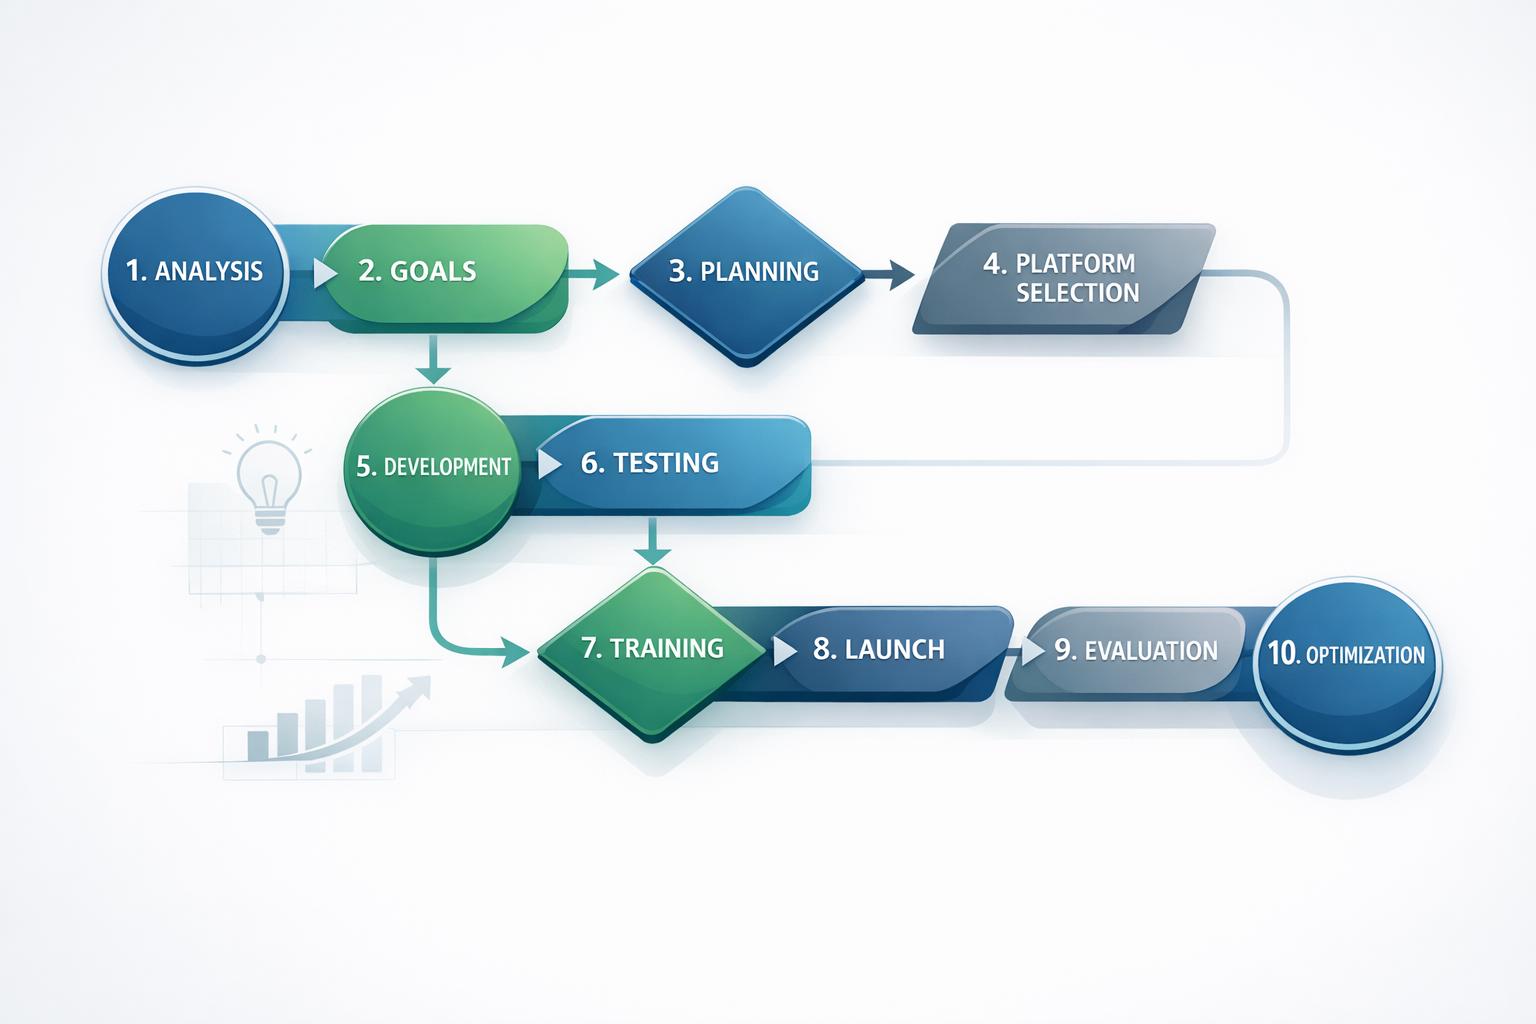
10-Step LMS Implementation Process Guide
Implementing a Learning Management System - Part 1 | How to Implement an LMS
Step 1: Set Goals and Align with Business Objectives
The first step in implementing a Learning Management System (LMS) is defining its purpose. As Steve Neher, CEO at Mail King USA, explains:
"A successful LMS implementation starts with clear goals and a structured rollout plan. At Mail King USA, we began by defining exactly what we needed from our LMS–streamlined training, easy tracking, and scalability."
Start by conducting a gap analysis to identify current shortcomings and future requirements. Anonymous employee surveys can provide honest feedback about skill or knowledge gaps. Collaborate with HR, L&D, IT, and leadership teams to ensure alignment on LMS objectives. Are you dealing with high first-year turnover? Is your sales team falling short of targets? Are compliance certifications being overlooked? These challenges should guide your objectives. Having a clear purpose from the start lays the groundwork for identifying needs and defining actionable goals.
Identify Organizational Needs
Separate business goals from employee skill gaps. Business goals might involve increasing revenue or improving customer satisfaction, while skill gaps are the specific areas where employees fall short in achieving those goals. For instance, if your goal is to boost sales by 20%, the skill gap could be a lack of detailed product knowledge among your sales team.
Evaluate your existing resources to determine what can be repurposed and what needs to be developed from scratch. Map out user journeys for administrators, managers, and learners to ensure the LMS fulfills all functional requirements.
Set SMART Objectives
Replace vague aspirations with Specific, Measurable, Achievable, Relevant, and Time-bound (SMART) objectives. For example, instead of saying "increase sales", set a target like "increase sales revenue by 20% within six months by delivering comprehensive product training". Similarly, aim for measurable outcomes like reducing new hire time-to-productivity by 15% within a year.
Here are some examples:
| Business Concern | LMS Alignment Strategy | Measurable KPI Example |
|---|---|---|
| High New Hire Turnover | Structured LMS-driven onboarding program | Increase first-year retention by 20% |
| Inefficient Training | Streamlined tracking and automated workflows | Reduce onboarding time from 6 to 4 weeks |
| Underperforming Sales | Targeted sales training and product knowledge | Increase deals closed per quarter |
| Compliance Risks | Automated certification and mandatory training | 100% completion rate for annual compliance |
Before launching, establish baseline metrics to measure the system's effectiveness post-implementation. For example, if you don’t know your current "time to proficiency" for new hires, it’ll be hard to prove the LMS made an impact. Tie your LMS goals to measurable Objectives and Key Results (OKRs) to gain stakeholder support and secure the necessary resources. Once clear, measurable goals are in place, the next step is assembling the right team to ensure a smooth implementation.
Step 2: Build Your Implementation Team
Rolling out an LMS successfully hinges on having the right team in place - one that can handle every step of the process with precision. Implementing an LMS isn’t a solo effort; it’s a team sport involving collaboration across multiple departments. As Docebo puts it:
"LMS implementation requires a team effort, not blind optimism".
For small to mid-sized organizations, a team of 5 to 6 members is usually enough to cover key areas like administration, technical support, and content management. This implementation team should include three types of stakeholders: those directly involved in the setup, internal stakeholders from within the organization, and external stakeholders like vendors or consultants.
One key statistic to keep in mind: poor communication is a factor in over 33.3% of project failures. To avoid falling into that trap, you’ll need clear communication channels - tools like Slack are great for this - and an orientation session to clarify roles and timelines for everyone involved. Once communication tools and stakeholder groups are in place, the next step is to define the team’s roles and responsibilities.
Key Roles and Responsibilities
The Project Sponsor takes on executive-level accountability, ensuring the project has the funding and resources it needs while breaking down organizational barriers. This role also helps keep leadership aligned with the project’s goals.
The Project Manager acts as the glue that holds everything together. They coordinate tasks, manage timelines, and serve as the main point of contact with the LMS vendor. On the technical side, the IT Administrator is responsible for configuring the system, managing integrations like SSO and HRIS connections, and overseeing data security. It’s crucial to involve IT early on - they play a key role in data migration and ensuring the LMS works seamlessly with existing systems.
The L&D Lead focuses on the content strategy, making sure the platform supports the organization’s learning objectives. Meanwhile, Subject Matter Experts (SMEs) bring their specialized knowledge to the table, helping to create and validate training materials. Since content creation often requires input from multiple departments, this is very much a team effort.
To drive user adoption, you’ll need a Change Champion. This person handles internal communications, promotes the LMS, and leads training sessions to get everyone on board. Lastly, the User Representative - a member of the learner community - provides feedback to ensure the platform meets real-world needs.
| Role | Primary Responsibilities |
|---|---|
| Project Sponsor | Executive oversight, securing funding, and removing organizational barriers. |
| Project Manager | Managing timelines, coordinating tasks, and serving as the vendor’s main point of contact. |
| IT Administrator | Configuring the system, handling integrations, and ensuring data security. |
| L&D Lead | Developing the content strategy and aligning it with learning objectives. |
| Subject Matter Experts | Creating and validating specialized training content. |
| Change Champion | Promoting user adoption, managing internal communications, and leading training sessions. |
| User Representative | Offering feedback on usability and ensuring the platform meets learner needs. |
When assigning these roles, focus on specific, measurable goals instead of vague responsibilities. For instance, set deadlines like “complete data migration by March 15” or “finalize user training guides by April 1”. Assigning clear deliverables not only keeps the team on track but also lays the groundwork for evaluating systems and resources in the next step.
Step 3: Review Current Systems and Resources
Before diving into a new LMS, take a step back and evaluate your current software, technical setup, and learning materials. This is your chance to figure out what stays, what goes, and what needs to integrate with the new system. Make a list of all necessary integrations - simple ones like SSO or basic HRIS connections can add 2–4 weeks to your timeline, while more complex setups or legacy system migrations might take anywhere from 6–12 weeks.
Next, audit your existing content. Review all your e-learning materials - SCORM files, PowerPoints, videos, PDFs - and decide what’s worth keeping, what needs updating, and what can be retired. Since about 51% of organizations create their training materials in-house, it’s worth checking whether your current authoring tools are compatible with the new LMS. Doing this upfront can save both time and money by avoiding the migration of outdated or unnecessary content.
Your IT team should be involved from the start. They’ll need to assess whether your current infrastructure can support the new system or if a cloud-based solution is a better fit to ease the load on internal servers. Keep in mind that cloud-based implementations typically take 3–9 months, while on-premise setups require 6–12 months due to their heavier infrastructure demands. During the trial phase, IT should also confirm that SSO works seamlessly with existing credentials to prevent future login issues. With a clear understanding of your integration needs, it’s time to evaluate your technical infrastructure.
Evaluate Existing Infrastructure
Your technical setup plays a big role in determining what’s possible with your LMS. Start by assessing whether your organization has the server capacity and IT support for an on-premise solution, or if a cloud-based model would be more practical.
The choice between cloud and on-premise hosting isn’t just about preference - it’s about what your infrastructure can handle. Cloud-based systems require minimal internal resources since the vendor manages hosting, making them quicker to deploy and easier to scale. On-premise solutions, on the other hand, offer more customization but demand significant hardware investment and ongoing IT maintenance. With over 50% of L&D leaders in 2024 citing budget constraints as a major hurdle for online learning strategies, picking the right deployment model is critical for staying within budget.
Data compatibility is another key factor. Check whether your current eLearning materials comply with modern standards like SCORM, xAPI, or cmi5. If not, you may need to rebuild these materials, which can add both time and cost to your project. Conduct a thorough audit to determine which user profiles, certifications, and course assets are clean enough to migrate and which ones should be left behind. As Jaisri Narasimman, Principal Analyst at SelectHub, points out:
"Testing an LMS before launch ensures all requirements are met, features work as intended and issues are resolved early. This proactive approach prevents post-launch problems and enhances user experience".
Lastly, don’t forget about branding. Your LMS should align with your corporate identity, so confirm that the platform supports the level of customization you need. Once you’ve clarified your infrastructure requirements, shift your focus to budgeting and timeline planning.
Determine Budget and Timeline
Creating a realistic budget and timeline involves understanding all the factors that can impact both. Your first major decision is the type of deployment - cloud-based or on-premise. As mentioned earlier, cloud-based systems typically take 3–9 months to implement, while on-premise solutions require 6–12 months. If you’re replacing an existing LMS, be sure to account for potential contract termination fees or exit costs from your current vendor. This is more common than you might think - 44% of companies with an LMS start looking for a replacement within two years.
Refer back to the integration time estimates when planning your schedule. Your budget should cover more than just licensing fees. Factor in internal staffing costs for IT specialists, project managers, and L&D leads, or the expense of hiring external consultants. Content development is another significant consideration, particularly if you need instructional designers to create new materials from scratch. The state of your learning materials will also influence costs - converting PowerPoints to e-learning, for example, takes more time than migrating SCORM-compliant files.
Work backward from your target launch date to map out key milestones and deadlines. A structured implementation plan typically spans 15–17 weeks, but it’s wise to build in buffer time for unexpected hiccups. Issues like data migration errors, software incompatibilities, and integration delays are common, so plan for them. Before signing any vendor contract, double-check that setup, customization, and ongoing support are included to avoid surprise fees later.
The content audit you completed earlier will come in handy now. Identify materials that can be archived instead of migrated to save time and money. Use consistent data formats, like CSV, for migration to minimize errors and speed up the process. Keep in mind that 87% of companies seeking a new LMS cite the need for a better user experience as their main reason. Budgeting adequately for customization and testing will help ensure you get it right the first time.
Step 4: Select Your LMS Platform
With your infrastructure assessment done and your budget finalized, it's time to evaluate LMS platforms. Did you know that 98% of large companies and 80% of small companies already use an LMS? The corporate e-learning market is also on track to hit nearly $50 billion by 2026. The key is to focus on features that align with your goals.
Start by creating a functionality matrix to separate "must-have" features from "nice-to-have" ones. For instance, if reducing employee turnover is a priority, look for platforms with personalized learning paths and AI-driven recommendations that offer tailored content. On the other hand, if compliance training is a major focus, prioritize platforms with advanced analytics that track completion rates and link learning outcomes to business performance. As Docebo wisely advises:
"Let the learning objectives you want to achieve guide which features to look for. Not the other way around".
This approach ensures you're evaluating platforms based on your specific needs rather than flashy extras.
When attending vendor demos, request tailored scenarios that mirror your technical setup. For example, if you need Salesforce integration or Single Sign-On (SSO) compatibility, ask for a live demonstration of these workflows instead of settling for generic overviews. During free trials, test the platform's performance by uploading large datasets or configuring user roles. This hands-on testing helps confirm whether the system meets your operational requirements.
Key Features to Look For
AI-powered tools should be a top priority. Modern LMS platforms use AI for natural language search, virtual coaching, auto-tagging, and even automated content creation. These features streamline administrative tasks and empower learners to navigate the platform independently. For example, platforms like Juno Journey use specialized AI agents: Jaden builds courses from raw materials, Jemme crafts personalized development plans, Jeremie validates open-ended responses, and Jasmine searches through company resources. These tools can save your Learning and Development (L&D) team countless hours on manual tasks.
Integration capabilities are another critical factor. Ensure the platform connects with your existing systems, such as HRIS, CRM tools like Salesforce, SSO providers, and video conferencing platforms like Zoom or Microsoft Teams. Ask vendors for realistic timelines for integrations and how they handle potential data migration challenges.
Mobile responsiveness is essential in today's hybrid work environment. With online learning users expected to reach 57 million by 2027, your LMS should offer native mobile apps or responsive designs that adapt to any device. Whether employees are at their desks, on the factory floor, or working remotely, they should have easy access to training materials.
Don't overlook content management standards. Your LMS should support formats like SCORM and xAPI to ensure smooth migration of existing materials and compatibility with third-party content providers. The platform should also handle diverse content types - videos, PDFs, interactive modules, and even user-generated content. Features like discussion boards and peer-to-peer learning can significantly boost engagement levels.
| Feature Category | What to Verify | Why It Matters |
|---|---|---|
| AI & Automation | Natural language search, auto-tagging | Reduces admin workload; enhances learner independence |
| Integration | HRIS, CRM, SSO, video conferencing compatibility | Prevents data silos; simplifies user management |
| Mobile Access | Native apps, responsive design across devices | Ensures accessibility for all employees |
| Content Standards | SCORM, xAPI | Enables content portability and vendor flexibility |
| Analytics | Configurable dashboards, ROI tracking | Links learning efforts to business outcomes |
Beyond these features, consider the platform's scalability and support infrastructure to ensure long-term success.
Assess Vendor Support and Scalability
Choose an LMS that can grow alongside your organization. As the Continu Team notes:
"Choose an LMS that can scale with you... The issue is, a few years later, you've grown significantly and as a result, outgrown your LMS partner".
Test the system's ability to handle your current workforce and future growth - whether you have 500 employees now or expect to scale to over 100,000. Check if the vendor allows you to add new features or extensions as your needs evolve without requiring a full system overhaul. This ensures your LMS remains a good fit as your organization changes.
Vendor support quality is equally crucial. Look for providers offering dedicated Customer Success Managers (CSMs) who can act as part of your implementation team. A CSM should guide you through best practices and provide expert insights throughout the platform's lifecycle. Make sure the vendor offers multiple support options, such as live chat, help desks, tutorial videos, and comprehensive knowledge bases.
Consider "train-the-trainer" programs that empower your internal experts to teach others how to use the platform effectively. This strategy worked well for companies like Mail King USA, whose CEO, Steve Neher, shared:
"A successful LMS implementation starts with clear goals and a structured rollout plan. At Mail King USA, we began by defining exactly what we needed from our LMS–streamlined training, easy tracking, and scalability".
Similarly, Shane McEvoy, MD of Flycast Media, highlighted the importance of internal champions:
"Implementation isn't just about launching the LMS–it's about ensuring people use it. We assigned LMS 'champions' within each team, giving employees a go-to person for questions".
Finally, clarify the contract details to avoid hidden fees. Some vendors bundle implementation, integration, and content setup into the initial contract, while others charge separately for these services. For industries with strict regulations, ensure the LMS complies with standards like GDPR, HIPAA, ISO 27001, or SOC 2.
Don’t forget to evaluate data portability. Your LMS should allow you to export content and learning records easily, making it simpler to switch providers if needed. With 87% of organizations seeking a new LMS citing the need for a better user experience as the main reason, having the flexibility to move on if the platform falls short is a smart safeguard.
Step 5: Create a Project Plan and Timeline
Once you've chosen your LMS, it's time to craft a detailed project plan. The implementation process can take anywhere from 1 to 12 months, depending on the system - cloud-based solutions typically require 3 to 9 months, while on-premise installations can stretch from 6 to 12 months. To keep things organized, break the project into smaller, manageable phases, each with specific deliverables. Be sure to include buffer time for tasks that might carry higher risks.
Start by identifying technical dependencies. Basic integrations, like Single Sign-On (SSO), usually require an extra 2–4 weeks, whereas more complex setups might take 6–8 weeks. Creating an integration map early on can help you avoid unexpected delays. Also, revisit the integration timelines outlined in earlier steps to ensure everything aligns. Before setting a launch date, audit your existing content. While migrating SCORM-compliant files is relatively straightforward, developing new, interactive materials from scratch demands significantly more time and effort. This phased approach sets the stage for testing and user training in the later stages.
Your project plan should also outline clear responsibilities for each phase. Roles like Project Sponsor, IT Administrator, and Change Champion are essential to keep things on track. The Project Sponsor ensures accountability, the IT Administrator handles technical configurations, and the Change Champion drives user adoption. Assigning ownership to these roles can help prevent communication breakdowns, a common cause of project failures, affecting more than one-third of implementations.
Define Phases and Milestones
With the overall timeline established, divide the project into distinct phases. A typical LMS implementation flows through six key stages: Planning & Alignment, Configuration & Integration, Content & Data Migration, Testing & Pilot, Training & Change Management, and Launch & Optimization. These phases align with earlier discussions on team roles and system evaluation.
For a 16-week rollout, you might structure it like this:
- Weeks 1–2: Planning and securing stakeholder approval.
- Weeks 3–6: Configuring the system and integrating it with HRIS.
- Weeks 7–10: Migrating content and developing courses.
- Weeks 11–12: Conducting User Acceptance Testing (UAT) and a soft launch with a small group.
- Weeks 13–14: Training administrators and creating user guides.
- Weeks 15–16: Full rollout.
High-risk phases, such as data migration or troubleshooting, should include extra buffer time. A 2 to 4-week pilot program is also essential. This soft launch allows a smaller group of users to test the system, uncovering any glitches and gathering feedback to address potential issues before the full rollout. During UAT, your admin team should follow a detailed script to ensure every feature - like login, navigation, course enrollment, and reporting - functions as expected.
Your planning shouldn't stop at the launch. Schedule follow-up evaluations at 30, 60, and 90 days to fine-tune the system based on actual usage data. Define success metrics, such as course completion rates or user adoption percentages, during the initial planning phase. These benchmarks will help measure whether your LMS is meeting its goals and delivering the ROI you anticipated. Regular reviews ensure your LMS continues to align with your organization's needs.
sbb-itb-612c355
Step 6: Configure the LMS and Set Up User Roles
Once your project plan is in place, the next step is to configure the LMS and establish user roles. This is where you define how the system will operate securely and efficiently. Start by setting up a clear hierarchy of roles. Common categories include:
- Administrators: Full system control.
- Instructors: Responsible for managing content and grading.
- Managers: Focused on team performance reports.
- Content Developers: Tasked with designing and uploading materials.
- Learners: Accessing and completing assigned courses.
To maintain security, apply the Principle of Least Privilege (PoLP) - granting users only the access they need to perform their responsibilities. This minimizes risks and keeps the system secure.
For organizations with multiple departments, consider creating segmented user groups. This allows department heads to view only their teams’ data. Streamline access further by integrating Single Sign-On (SSO), enabling users to log in with existing company credentials. If possible, connect the LMS to your HRIS (Human Resource Information System) to automate user management. This ensures permissions are updated automatically as employees join, switch roles, or leave the company. By taking these steps, you’ll establish a solid framework for upcoming phases, like testing and running pilot programs.
"I began by interviewing key stakeholders - administrators, instructors, and learners - to uncover their specific challenges and goals... These insights shaped how we customized the system to ensure it addressed their pain points effectively."
– Erin Siemek, CEO, Forge Digital Marketing LLC
Personalize the System
To encourage user engagement, customize the LMS interface with your company’s branding. Add logos, color schemes, and themes that align with your organization’s identity. A familiar look and feel can significantly improve user adoption. Additionally, set up automated workflows to simplify operations. For instance, configure notifications for course deadlines, reporting schedules, and enrollment confirmations to match your team’s daily routines.
Fine-Tune Permissions and Test Settings
Once the main roles are defined, refine the permissions for each. Be specific about what each role can access. For example:
- A Content Developer may need access to upload and edit training materials but shouldn’t see learner performance data.
- A Manager might review completion rates for their team but won’t need the ability to modify system settings.
Documenting these permissions in detail will make troubleshooting easier and maintain clarity across the team.
Before launching the system, conduct User Acceptance Testing (UAT). Use a checklist to ensure users can log in, navigate the system, enroll in courses, and generate reports without issues. Plan for a 2–4 week soft launch with a diverse group of users. This trial period can help identify any configuration problems and gather feedback to improve usability. Testing these settings thoroughly during the pilot phase (discussed in Step 9) will confirm that the system meets your organization’s needs.
With approximately 98% of large companies and 80% of small companies already using an LMS, it’s crucial to get these configurations right from the start. A well-structured setup now will save time and effort down the line.
Step 7: Migrate Content and Data
Now that your LMS is set up and user roles are defined, it’s time to move your training materials and learner data into the new system. This step requires a thoughtful approach to ensure you transfer only the necessary content while keeping everything accurate and organized. The goal? Bring over what truly matters and maintain data integrity throughout the process.
Start by conducting a thorough audit of your current content. Review every file, video, PDF, and SCORM package. Archive or delete anything outdated - like compliance courses that haven’t been updated recently. As Marialena Kanaki, Content Marketing Manager at TalentLMS, wisely notes:
"It's painstaking, absolutely, but migrating messy, inconsistent data is like pouring curdled milk into a perfect cup of tea – it contaminates everything".
In short, clean up your content before you migrate.
Organize and Standardize Content
Once you’ve decided what to keep, focus on organizing it. Create consistent naming conventions for all files and courses, such as "2026_ComplianceTraining_Module1." This makes navigation and searching easier for users. Convert documents into universal formats like PDFs and ensure videos are in formats compatible with your LMS.
To make content easier to find, tag it by topic, department, or skill level. Develop a mapping document to track where each piece of content currently resides and where it will go in the new LMS. This step helps prevent materials from getting lost during the transition and ensures your team stays on the same page.
Ensure Data Integrity
Data migration isn’t just about moving files; it’s also about cleaning and standardizing your data. Use the ETL process: extract data from its current sources, clean it up (e.g., standardize inconsistent country names), and eliminate duplicate user accounts. Once everything is cleaned and standardized, load the data into the new LMS.
Before fully committing to the migration, test it with a small group of users. This pilot run will help you verify that courses load correctly, progress tracking works as expected, and all assets are intact. Just before going live, perform a final delta migration to capture any last-minute changes, like new registrations or course completions. With your data in place, you’ll be ready to test the system’s functionality in the next phase.
Step 8: Connect with Existing Systems
Once your content and configurations are secure, the next step is to link your LMS with key systems to create a more cohesive learning environment. Instead of being just another standalone platform, your LMS can become a central hub that simplifies workflows and boosts efficiency. Start by identifying essential integrations like HRIS, CRM, and SSO that align with your organizational goals.
Begin with mapping out how data flows between your systems. Pinpoint crucial data points - such as new hire information, job roles, department structures, and course completion records - that can be automated. As Vanessa Kahkesh, Content Marketing Manager at Rippling, puts it:
"By integrating your LMS with other tools and platforms, you can automate tasks, enhance compliance, and streamline onboarding".
Make sure your LMS supports widely-used protocols like APIs, SCORM, xAPI, and LTI to simplify the integration process. Depending on complexity, integrations typically take 2–4 weeks, or up to 6–8 weeks for more intricate setups. Choosing vendors with open APIs and pre-built connectors for popular tools like Salesforce, HubSpot, or Workday can save time and reduce the need for custom coding.
HRIS and SSO Integration
After laying the groundwork for integrations, focus on connecting your LMS to your HRIS and setting up SSO. Implementing SSO with protocols like SAML or OAuth can eliminate login hassles, making it easier for employees to access the LMS using their existing company credentials. This not only improves user adoption but also cuts down on password-related support requests.
For a seamless onboarding process, integrate your LMS with your HRIS or HCM system. For instance, when a new employee’s start date is entered into your HR platform, they can automatically be enrolled in orientation courses without requiring manual input. Similarly, when employees change roles or leave the company, their LMS access can be updated instantly. Test these integrations over a 2–4 week period to ensure data accuracy and smooth performance.
Step 9: Test and Run a Pilot Program
Once your integrations are in place (see Step 8), it’s time to put your LMS to the test with a pilot program. This trial phase, typically lasting two to four weeks, allows you to evaluate system performance in a controlled environment. The idea is to identify technical hiccups, usability challenges, and content gaps before rolling it out to the entire organization. Think of it as a trial run to ensure everything works smoothly without overwhelming your team.
To get unbiased feedback, select pilot participants who weren’t involved in the LMS implementation process. Aim for a diverse group, including employees from different departments and varying levels of technical expertise. Eleni Zoe from TalentLMS emphasizes the importance of this approach, stating, “find out if the LMS is indeed user-friendly and can be used even by less tech-savvy employees”.
During the pilot, assign users specific tasks like logging in via SSO, enrolling in courses, completing assessments, and accessing reports. Test these workflows across multiple browsers and devices to ensure compatibility. As issues arise - whether they’re bugs, broken links, or confusing navigation - document them thoroughly. Once testing wraps up, use the findings to refine your LMS setup.
Collect and Analyze Feedback
Gathering feedback is key to fine-tuning your LMS. Use tools like surveys, focus groups, and interviews to understand what’s working and where users encounter hurdles. Keep an eye on metrics like course completion rates, assessment scores, and time spent on tasks to pinpoint problem areas. Steve Neher, CEO of Mail King USA, highlights the importance of this process:
"Most importantly, we gathered feedback early and often, making real-time adjustments to optimize the user experience".
Leverage this feedback to make targeted updates before the full launch. This might include fixing technical issues, revising confusing content, updating FAQs, or tweaking user permissions. Address the critical bugs first - this ensures your team isn’t overwhelmed with larger-scale problems later. Plus, resolving key issues early builds trust among pilot participants, who can become advocates for the system during the broader rollout.
Step 10: Launch and Provide Continued Support
Once you've refined your LMS based on pilot feedback, it's time to roll it out across the organization. But launching isn't just about flipping the switch - it's about ensuring employees genuinely engage with the platform. Instead of a one-size-fits-all rollout, consider introducing the LMS in phases, department by department. This step-by-step approach aligns with the structured planning you've already established, making it easier to handle support requests and resolve issues before they affect everyone.
Clear and consistent communication is key during this phase. Use multiple channels - such as company-wide emails, newsletters, and teaser videos - to introduce the LMS. Highlight its features and, most importantly, how it benefits employees personally, like advancing their careers. To make the messaging even more effective, create learner personas like "The Busy Manager" or "The Go-Getter" and tailor your communication to address their specific needs and challenges.
Train Employees and Encourage Adoption
To ensure everyone feels confident using the LMS, offer a variety of training options, such as live workshops, video tutorials, and one-on-one sessions. Appoint department-level LMS Champions - trusted colleagues who can answer questions, share tips, and encourage adoption. These champions can help build trust and excitement by distributing promotional materials and offering incentives.
Keep employees engaged with gamification and social learning features. For instance, you could launch a "Knowledge Contest" with prizes or hide fun "Easter eggs" like secret badges or quirky videos within courses to spark curiosity. Managers also play a vital role in adoption - give them early access to reporting tools and discussion prompts so they can guide their teams and reinforce accountability. Once training is underway, make sure robust support systems are in place to maintain momentum.
Build Strong Support Systems
Ongoing support is essential for the long-term success of your LMS. Start by creating a self-service knowledge hub filled with searchable articles, how-to videos, step-by-step guides, and FAQs. Pair this with a dedicated help desk that uses SLA-based ticketing and offers assistance through email or SMS. In-app guidance, like tooltips and banners, can also provide instant help when employees need it.
For the first two weeks post-launch, implement a hypercare period with daily office hours and rapid-response support to address any immediate issues. Regular Q&A sessions and virtual training workshops can further ease the transition. To keep improving the system, schedule 30-, 60-, and 90-day review cycles, using in-app surveys and suggestion boxes to gather feedback. When you make updates based on employee input, let them know with messages like "You spoke, we listened..." - this shows their feedback is valued. Lastly, track key metrics like Monthly Active Users (MAU), course completion rates, and social interactions to monitor engagement and ensure the platform stays on track.
Conclusion
Rolling out an LMS requires thoughtful preparation, and these 10 steps offer a structured path to get you started. But remember, launching the system is just the first chapter of your LMS journey. As Shane McEvoy, MD of Flycast Media, wisely notes:
"Implementation isn't just about launching the LMS–it's about ensuring people use it".
To truly harness the potential of your LMS for employee development and business growth, set up regular review checkpoints at 30, 60, and 90 days after launch. These milestones are perfect for tracking critical metrics like user adoption, course completion rates, and overall ROI. Tools like in-app surveys and suggestion boxes can capture real-time feedback. Acting on this feedback not only improves the system but also keeps employees engaged by showing them their input matters.
It's not just about the numbers, though. Regularly evaluate the quality and relevance of your training materials to ensure they align with current industry trends. On the technical side, keep an eye on system performance - issues like bugs, slow load times, or integration errors can discourage users. Continuous improvement is the key to bridging the gap between a system that works and one that thrives.
As your business evolves, so should your LMS. Work closely with your vendor's customer success team to refine and optimize the system over time. Keep an updated integration map to ensure your LMS remains compatible with tools like HRIS, CRM, and SSO systems as your tech stack grows. Think of your LMS as a living, adaptable platform - one that supports a culture of learning while delivering measurable results. By following these strategies, you’ll not only launch your LMS successfully but also ensure it becomes a driver of ongoing employee development and business success.
FAQs
What roles are essential for a successful LMS implementation?
A successful LMS implementation hinges on assembling a well-rounded team that can address both the technical and educational aspects of the project. Here’s a breakdown of the key roles involved:
- LMS Implementation Consultant: This professional takes charge of system setup, integration, and aligning best practices with your organization’s goals to ensure a smooth rollout.
- Project Sponsor or Stakeholder: A senior leader who advocates for the project, secures necessary funding, and ensures it aligns with broader company objectives.
- IT Lead or Technical Team: This group manages the technical side, including integrating the LMS with existing systems, maintaining infrastructure, and ensuring security and reliable performance.
- Content Owners and Subject-Matter Experts (SMEs): These individuals create and validate learning content, ensuring it’s accurate, engaging, and tailored to the users’ needs.
- LMS Administrator or Learning Manager: Responsible for the day-to-day operations of the platform, including user management, generating reports, and driving continuous improvements.
By bringing together this team of experts, your organization can ensure a seamless LMS implementation that not only meets technical requirements but also delivers impactful learning experiences for long-term success.
How can we make sure our existing content works with a new LMS?
To make sure your current learning materials work smoothly with a new LMS, start with a content audit. Go through all your courses, videos, documents, and assessments to figure out their formats (like SCORM 1.2, xAPI, or MP4) and key details such as skill tags or completion criteria. Match this information with the technical requirements of the new LMS, and adjust any files or metadata to ensure they meet the necessary standards.
Once updates are made, test a sample of your content in a sandbox environment. This step lets you verify playback, navigation, quiz scoring, and reporting features. Bring in subject-matter experts to confirm that learning objectives and multimedia elements remain intact. Fix any issues that come up during this testing phase before moving the entire library.
Lastly, document each step of the process and create a checklist for the full migration. Tools like Juno Journey can help streamline this by using AI to spot incompatible content and suggest updates, making the transition smoother and ensuring a top-notch learning experience.
How can we encourage employees to adopt a new LMS?
To encourage employees to embrace a new LMS, start by focusing on clear and open communication. Explain why the platform is being introduced and highlight the benefits it brings, both for personal development and company success. Leadership should actively endorse the system, framing it as a tool that aligns with career growth and organizational goals. When announcing the launch, emphasize how it will simplify tasks and enhance the overall work experience.
Make the onboarding process as smooth as possible. Offer short, role-specific tutorials that walk users through essential steps like logging in, navigating the system, and completing an initial course. To support users during the rollout, provide easy-to-access resources such as FAQs, video walkthroughs, and a dedicated support contact for questions. Adding a touch of fun can also help - consider gamifying the experience with badges or small rewards to boost engagement.
Monitor adoption by tracking metrics such as login frequency and course completions. Pair this with employee feedback through quick surveys to identify areas for improvement. Celebrate achievements by recognizing top users publicly, which can motivate others to participate. With consistent backing from leadership and ongoing support, your LMS can become a key part of daily learning and professional development.